200 moons, 2024 (process)
Published by m.stenta on May 23rd, 2024 (moon 201)
View the negative and timelapse of 200 moons, 2024.
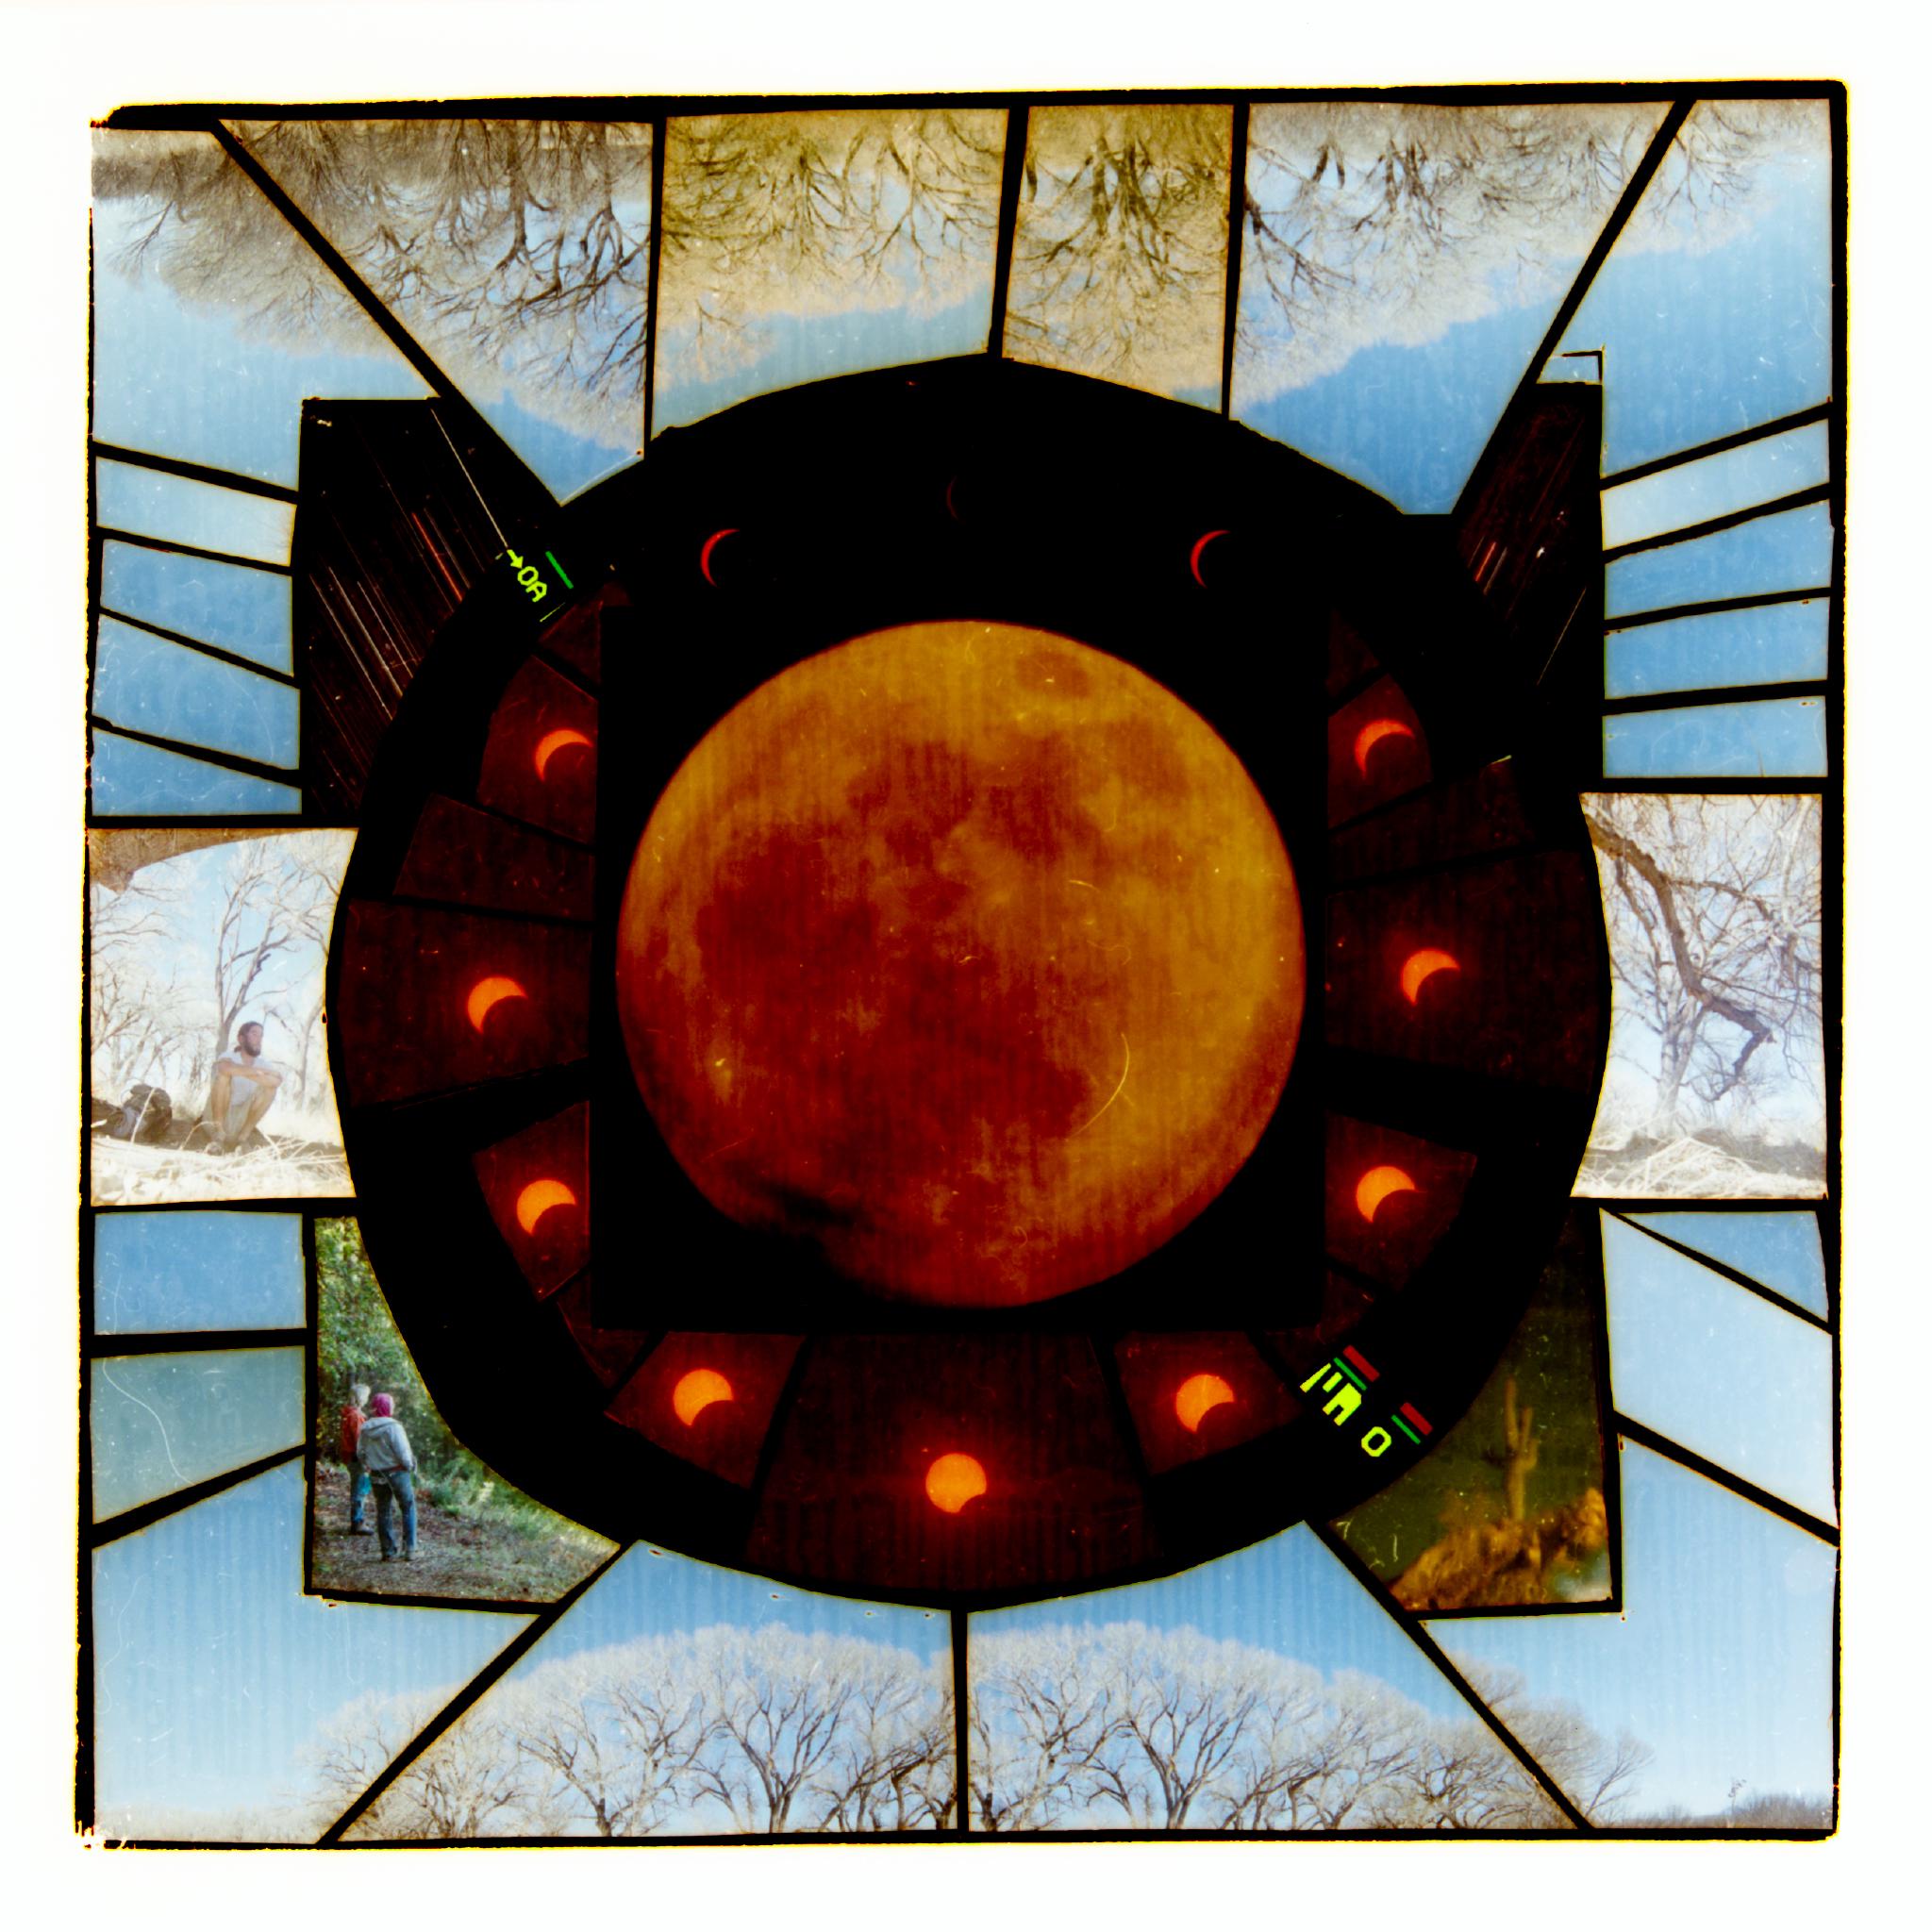
This work commemorates the 200 full moons that have passed since February 2008.
The image in the center of this mosaic is a photograph of the full moon on April 23rd, 2024, captured through the mirrors of a 16" Schmidt-Cassegrain telescope. It is a medium-format color film negative exposed with a Pentax 6x7 camera. Circling the moon are 12 images of the April 8th solar eclipse from my vantage point in Connecticut (~92% magnitude) exposed with a Nikon 35mm camera. All the other negatives were created in February 2008.
Creating a large negative of the full moon was a new challenge for me. I had three months (three moons) to figure it out. What follows is an account of the process, considerations, and coincidences encountered along the way.

Inspiration
The full moon of February 2008 was a pivotal moment in my life. I made a decision to leave where I was and take a path I hadn’t planned on. The moon exerted it’s gravitational pull, and my trajectory was bent around it.
I thought about that as I looked up at the full moon on January 25th this year, and I felt a similar force of inspiration. I wondered how many moons had passed since that one 16 years ago. Later that night I counted them. January marked the 197th. April 23rd would be the 200th. That felt significant, so I made it my goal to capture that moon’s light on film, and use it to create a constructed negative in honor of all the time that has passed.
February 24th, 2024
On the next full moon (February 24th), I woke up early and drove to the top of the hill with my Nikon FM10 and a 200mm telephoto lens. I shot two rolls of 35mm ISO 400 film (1 color and 1 black and white).
The moon has appeared in many of my works, but when it is captured in an actual photographic negative it tends to be quite small. This is simply because the moon is very far away (250 thousand miles), and a typical camera lens captures too much of the sky around it as well. The moon may appear large in the sky to our eyes, but an objective instrument like a camera doesn’t see it that way. You need a lens with a long focal length to obtain a narrow field of view.

Even with a 200mm lens, I knew that the moons on these negatives would be small, but the sky was clear and I wanted to get my head into the project. The weather is unpredictable, and there was no guarantee I would have an opportunity in April, or during any of the full moons in between. I had to cross my fingers and take every opportunity to experiment.
I filled the rolls, and shot multiple exposures on many of the negatives. I didn’t have a design for the larger mosaic in mind yet, so I experimented. Perhaps the finished image would include 200 small moons! As my ideas were churning, the thought of image size was always on my mind.
The constructed negative process is interesting because the image manipulation and post-processing options are limited. Each work is a mosaic of original film negatives, cut up and arranged together into a larger image. The individual negatives that comprise it are just pieces of plastic and silver with an image burned into them. They cannot be shrunk or enlarged. The physical nature of film makes it an original witness of the light that touched it, focused through the lens of the camera into a fixed area. The only time that image size can be manipulated is at the time of exposure.
How big could I make the moon’s image on a negative, without investing in special equipment, and with April 23rd as my deadline? Could I fill a 35mm negative? What about a medium format (120) negative? I became enamored with the idea of a big moon negative! And the technical challenge only made it more alluring. I wasn’t concerned with perfect image quality, it would be cut up into a mosaic after all, it just needed to be big and recognizable.
Film size
If you are unfamiliar with film sizes, it might be useful to understand how they relate to digital photography. In both contexts, light is focused through the camera’s lens onto a “sensor.” In the case of analog cameras, the film is the sensor. Instead of converting light waves into digital signals and saving a copy of the information to a file, film uses fine grains of light-sensitive silver halide to capture photons of light permanently in the film itself.
A “full-frame” digital sensor is equivalent in size to a 35mm film negative, which is the most popular film size. But larger films are also available. 120 is a common “medium-format” film size, producing negatives that are 56mm tall, and range in width from 41.5mm to 224mm, depending on the camera.

A bigger negative means more resolution available for enlarging the image on a screen or print. Constructed negatives are essentially “large-format” negative mosaics, so they have the potential to be printed very big. And building them from medium-format negatives means bigger pieces to work with.
This is why I wanted a medium-format negative of the moon. But in order to project an image of the moon onto a 56mm tall negative, I would need a very long lens.
East Road
A few days after the February full moon, by some cosmic coincidence, I found the Spring issue of UConn Magazine in my mailbox, and the word “moonshot” on the cover caught my eye.

The article describes the restoration of the East Road Observatory in town. East Road was five minutes from my house, but I had never seen or heard of this observatory. It had been sitting in disrepair for decades on the edge of a field, with trees slowly growing up around it.
A team of employees, students, researchers, an alum, and an elite telescope builder brought this important piece of research equipment and UConn history back to life.
I contacted Professor Matt Guthrie, the observatory’s new steward, to inquire about it and explain what I was trying to do. Matt graciously invited me out the following Tuesday to see the telescope in person.
Allen Hall, a local telescope designer who helped with the rebuild, was also mentioned in the article. I plugged his name into a search engine and found a book called Budget Astrophotography, which not only covers all the basics of the craft, but also has an entire section dedicated to low-cost DIY setups. It felt like another breadcrumb on my trail, leading me in the right direction, so I bought a copy and brought it with me.

Matt welcomed me into the little observatory and showed me the telescope. We talked about cameras, different ways of connecting them to telescopes, and the challenges of focus, exposure time, and sky tracking. It was extremely helpful to see the constraints up close and talk to someone with experience.
He also pointed out that Allan Hall (the author of the book) was not the same Allen Hall (with an “e”) that helped with East Road. It was just another strange but ultimately helpful coincidence, that there are two well-known astronomers with (almost) the same name. Allen’s work on the telescope in my town led me to Allan’s invaluable book. I’m grateful to both!

Matt provided me with the ray diagram for the observatory’s 16" Schmidt-Cassegrain telescope, so I could simulate the size of the moon through it on a medium-format negative with Stellarium. The result was incredible. It was perfect.

Let’s stop for a moment and appreciate just how perfect that is. If one were to consider all the possible telescope configurations, and the size of the moon’s image at each one’s prime focal point, without additional optics or eyepieces, it’s hard to imagine a more perfect fit. And this was a recently restored telescope right down the road from me. It’s hard to believe all of these things lined up.
But there were more challenges ahead. In theory, the observatory’s optics would make a perfectly sized moon image, but I still needed to figure out how to connect a medium format camera to it.

I decided to use a Pentax 6x7. As the name suggests, the Pentax 6x7 produces negatives in a 6x7 (56x70mm) format. The next step was finding the right adapter for this telescope.
Connecting the dots
It was easy to find a telescope adapter for my Nikon camera. It was more of a challenge to find a telescope adapter for the Pentax 6x7. My impression is that the Pentax 6x7 enjoyed some popularity in the astrophotography community, before digital photography came along, but it seems hard to find off-the-shelf parts for sale anymore.
I reached out to Allan Hall (the author of Budget Astrophotography) to see if he had any suggestions. He had a brilliant idea: buy a broken lens for the bayonet and have a machine shop fabricate the rest. I found a cheap donor lens , and I inquired around with machine shops, but the turnaround time would be long after my deadline.
Eventually I found Raf Camera, a shop that specializes in adapters of all shapes and sizes. It was the only place I found that carried Pentax 6x7 adapters of any kind, and they had a few different options in stock. The problem was that all the telescope adapters were located in their Belarus warehouse, and even expedited shipping wouldn’t guarantee arrival before I needed it.
Fortunately, they had two unrelated adapters that were available in a US warehouse which together got me close to what I needed: one had a Pentax 6x7 bayonet on one side and female M65x1 threads on the other, the other was a male M65x1 to female M42x1 adapter. The standard 1.25" eyepiece adapter that I used with my telescope was M42x075, so it wasn’t a perfect fit, but it was close. And it would arrive quickly, so I would have time to experiment with it.


When they arrived I connected my telescope to the Pentax 6x7 and looked through the viewfinder. It worked! But the vignetting was bad. Without the telescope connected, the viewfinder showed a full rectangular image. With the telescope, a smaller circle of image was visible. This was visual proof that my little Barska with a 1.25" eyepiece adapter wasn’t capable of filling a medium format negative.


Allan had predicted this in our earlier correspondence, and suggested that a 2" telescope adapter would most likely be necessary. I checked with Matt to see if it would fit the observatory, and with less than a month to go I ordered more adapters. I found a 2" telescope adapter with M48x0.75 threads, and an adapter from that to M42x1. Combined with my other two I had a working Pentax 6x7 2" telescope adapter. It was a hack, but it was solid and ready to go.


It fit perfectly into the East Road Observatory telescope. The 2" eyepiece still has some noticeable vignetting, but overall it was much better than the 1.25", and would work just fine for the moon shot.


Eclipse side quest
In between every full moon is a new moon. And the new moon between March and April of this year happened to be a solar eclipse. I set up on a hilltop with solar filters on my 35mm camera (for shooting) and my telescope (for viewing). I gathered some shots of the moon and sun together, in various magnitudes of eclipse, which would later become part of the same constructed negative.

Medium-format moonshot
Two weeks later, I walked out to the East Road Observatory at dusk. There was light cloud cover but the moon was visible near the horizon, just peeking through the trees with a deep orange hue. The moment had arrived.
A film crew was set up at the observatory that night, shooting footage for the university, and Matt had offered to let me come out and try for the moonshot after they were done. We waited until everyone packed up and left, then we connected the Pentax 6x7 to the telescope.
The moon was still low in the sky, and was blocked by trees. It’s path through the sky that night wouldn’t clear the trees for many hours. From far away it was like looking at the moon through a forest, with branches blocking a clear shot. The view through the telescope, however, was a different story. We were able to focus the light through the tree branches, such that they disappeared entirely and the full circle of the moon was clearly visible without any obstruction. I was thrilled, and utterly astonished at the clarity of the image I could see through the camera’s viewfinder. I couldn’t believe how good it looked.

I shot 10 exposures of 120 film at various shutter speeds, thanked Matt, and went home happy. The following week I mailed my film to Darkslide Film Lab for rush processing, and picked it up in person to see the results. Considering that this was my first serious experiment with medium-format planetary astrophotography, I couldn’t have been happier with the results.


Credit
I want to thank Professor Matt Guthrie for letting me use the East Road Observatory for this project, and Allan Hall for his book, Budget Astrophotography, and for generously answering my questions. I am also grateful to Rafael Pankratau of Raf Camera for stocking so many adapters! Big thanks to the maintainers of the free and open source Stellarium software. And special thanks to Emily Swift at Darkslide Film Lab for developing my film so quickly. It allowed me to complete this work in time to release it on today’s 201st full moon. Thank you!